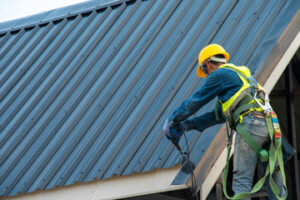
Routine pest control protects the value of your home and prevents costly property damage. Preventing moisture by fixing leaky pipes and using dehumidifiers can also reduce pest attraction.
Food contaminating pests such as cockroaches and rodents can spread disease-causing pathogens, resulting in costly waste and health risks. Visit https://www.benspest.biz/ to learn more.
Keep all foods stored in pest proof containers and wipe down countertops regularly. Eliminate entry points by caulking cracks and filling in holes, and by installing door sweeps and weather stripping.
The word “bug” is often used as a catch-all for any number of creepy-crawlies that cause problems around Long Island homes, but the truth is that there are many different types of insects. Understanding the domain, kingdom, phylum, class, order, family, genus and species of bugs is essential to pest control.
Insects are very numerous and can pose serious damage to crops and gardens. To keep an eye on their populations, homeowners should inspect plants frequently and look for insect excrement, holes in leaves or fruit, and twisted, deformed foliage. In addition, homeowners should be aware that many insect pests tend to peak in numbers during warm, sunny weather and at dusk or dawn.
Many soil-dwelling insects are pests and can limit crop yields or even kill them, including wireworms, cutworms, and white grubs. To avoid them, homeowners should plant into well-cultivated soil and use cultural and mechanical controls, such as row covers and reflective mulch. For other pests, such as beetles, spraying with horticultural oils and neem oil can help.
Rodents
Rodents are a significant threat to indoor spaces and their presence can lead to structural damage, food contamination, and safety hazards. They can also contaminate surfaces by leaving behind droppings, urine, and nesting materials. These contaminated areas can cause respiratory discomfort and worsen existing conditions such as asthma.
Rodents, which include mice and rats, are the most commonly encountered pests in residential spaces. They can gnaw through wires to create fire hazards and cause significant electrical damage. They also tear up important paperwork and family heirlooms that have been stored in attics.
They live in small, hidden spaces and can easily slip into homes through holes and cracks. A rat can squeeze through a hole the size of a quarter, so it’s important to cover gaps and cracks on exterior walls and around entry points in windows, doors, and pipes. Proactive pest control measures help prevent rodents by reducing food sources and eliminating their shelters. It’s important to address these threats before a rodent infestation starts, as the problem only gets worse over time.
Rodent Control
Rodents carry dozens of diseases and cause billions in damage each year to homes, farms, businesses, and stored foods. They spread disease through bite wounds, contaminated food and water, and by carrying ticks, mites, and fleas. Droppings and urine from rats and mice also stir up germs, which can be breathed in or ingested through food and water.
Rodent infestations are common in urban areas because of crowded conditions and abundant waste materials. They can also be a problem in suburban and rural settings due to easy access to food gardens, fruit and nut trees, and garbage disposals. Their quick reproduction rates make them a constant threat.
Long-term rodent control requires a combination of proactive and reactive measures. Regular inspections and assessments help identify infestation hotspots while evaluating environmental factors that contribute to rodent activity. Habitat modification like removing debris, trimming vegetation, and sealing entry points deprives rodents of their preferred feeding and nesting sites. Traps and bait stations can supplement these efforts while reducing use of harmful chemicals by encouraging natural predators that can safely reduce rodent populations.
Mosquitoes
Mosquitoes are a common problem for businesses, especially in wet climates. They are vectors for diseases like malaria, dengue fever, yellow fever, encephalitis and West Nile virus. Keeping mosquito populations down is essential to protecting staff and customers.
Most mosquitoes are not picky about their breeding sites – any small standing bodies of water will do. That includes bird baths, tarps, rain gutters, tires, children’s toys, discarded bottles and more. The good news is that most breeding sites can be easily removed by commercial pest control professionals.
Traditional mosquito control methods focus on adult habitats and larviciding. These methods may not address new breeding habitats that are created by environmental change or urbanization. In addition, mosquitoes can develop resistance to chemical repellents. In some cases, mosquitoes can also develop a sensitivity to carbon dioxide, which can reduce the effectiveness of spraying. This can be especially challenging to manage when the sensitivity develops around the feeding site, where the mosquito can’t avoid the carbon dioxide emitted from the victim’s skin. Behavioral adaptations can also undermine the efficacy of mosquito control measures.
Bed Bugs
Bed bugs are blood-sucking parasitic insects that can affect your health. They are opportunistic feeders and are most active at night, when they feed on exposed skin. While they don’t transmit any diseases, the itchy bites can cause loss of sleep and agitation.
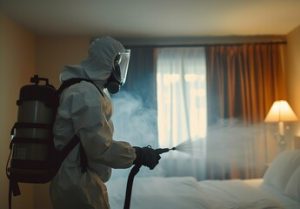
Bed bug infestations are very difficult to control and require special techniques. Most traditional pesticides do not have much impact on these bugs. Penetrating heat has been shown to be the most effective regimen for treating infested areas.
Homeowners and tenants should inspect secondhand furniture, linens and clothing for signs of a bed bug infestation before bringing them into the house or apartment. Look for small black flecks in the environment, which are bed bug feces, and a sweet, musty odor that is usually strongest near beds.
Regular cleaning, vacuuming and steam can reduce the hiding spots where bed bugs hide, but full elimination often requires professional help. Rentokil uses a unique mix of targeted service protocols and precise applications to ensure eradication. Recurring inspections are also available to help prevent a problem before it starts.
Ants
The ant’s size and diversity make it difficult to control with routine spraying. Many people’s initial reaction to seeing a line of ants trailing into their home is to grab the closest can of pesticide and spray the ants and their trails, which rarely results in any lasting impact.
Instead, effective ant control begins with prevention. Wiping down sticky surfaces, storing food in airtight containers, and promptly addressing leaks are key preventive actions to take inside and outside your property. Outside, a few simple strategies include applying a sticky barrier to the ground, wrapping trees with a tarp, and pruning to eliminate ant bridges.
Once ants find their way indoors, they are attracted to spills, crumbs, and improperly stored foods and can cause significant damage. Knowing which ant species is infesting your facility and locating the nest allows our technicians to recommend the most targeted treatment and prevention approach.
Cockroaches
Cockroaches are one of the most feared pests. They have a reputation for spreading diseases and creating foul odors. They’re also very resilient and can develop resistance to even the most powerful pesticides.
Cockroaches can be found in a variety of places, from sewers and trash bins to the undersides of kitchen cabinets and dining room chairs. They can pick up and carry disease-causing microorganisms as they crawl through dirty garbage cans, rotting food and other sources of filth. The feces, saliva and shed skin (or cuticles) left behind by cockroaches can cause allergic reactions in humans and trigger asthma attacks in those with respiratory issues.
They’re notorious for contaminating foods and food preparation surfaces as they scurry across them to search for their next meal. They can spread bacteria and viruses such as salmonella and E coli. In restaurants and other businesses that handle food, German cockroaches can be a sign of poor sanitation practices and lead to health code violations. They can also leave behind a musty, unpleasant odor and damage wallpaper and books.
Wasps
In addition to pollinating flowers and transferring pollen, predatory wasps also help keep pest populations in check. Many parasitic wasp species lay eggs inside of disease-carrying or damaging insect species, killing them before their offspring emerge. Farmers across the UK are now introducing parasitic wasps to their fields and hothouses in order to naturally eliminate aphid infestations without using chemical pesticides.
The researchers found that the social paper wasp Polistes satan is a successful predator on both sugarcane borer Diatraea saccharalis and fall armyworm Spodoptera frugiperda in crop fields, significantly reducing their damage. These findings provide the first experimental evidence that a common, natural wasp could be an effective native biocontrol agent for sustainable pest management in agriculture.
Because solitary wasps forage alone and have no swarming behavior, they pose less of a threat to people. However, their stings can cause a painful and sometimes life-threatening allergic reaction. To reduce the risk of stings, try to avoid disturbing wasp nests and removing their food sources. If a wasp nest does need to be treated, it is best to apply sprays at dusk or dawn when they are less active.